Guides and Terms
Wanting to get a repair? Come read about the terminology you'll encounter.
- How to Find the Nearest Station and Long Route Plotting
- Suggested Ship Builds and Modules
- Common Terms
- Common Mistakes and Issue Troubleshooting
- Other Tips and Tricks
- Fantastic Shortlinks and Where They Lead
- Fleet Carriers
- Soon
- Ship Registry Codes
- Frequently Suggested Things
- Paperwork Filing Guidelines
- Stellar Cone Escape Guide
- Recovery to Orbit
How to Find the Nearest Station and Long Route Plotting
Finding Stations
During rescues, especially Code Black ones or deep space situations where a Seal response may take longer than the client is willing to wait, it is useful to know how to quickly find appropriate stations or carriers the client could be redirected to. Several tools can help with this.
HalpyBOT
HalpyBOT is the bot running in our IRC channels and provides many useful commands. This section lists the ones relevant to finding stations, but you can find a full list of commands here.
| Command | Arguments | Use |
| !dssa | [System/CMDR/CaseNr] | Check for the closest DSSA carrier to a given location. |
| !diversion | [System/CMDR/CaseNr] | Calculate the 5 closest FDev-placed structures with repair capability near their main stars. |
| !landmark | [System/CMDR/CaseNr] | Check if a given point is near a landmark system. |
Inara
You can use Inara's Search Nearest feature to find the closest station or carrier to a given location with filtering options to ensure the station has Repair facilities, appropriate landing pads and limit its distance to their main stars. Below is a table showing what to enter in each fields:
| Field | Required? | What to enter |
| Near star system | yes | The system in which you or the client are located |
| Select galactic region | Do not use | |
| Government/Allegiance/Faction Name | May be useful if the Client is wanted by specific factions to avoid the station and system security attacking them. | |
| Station type | Can be used to filter for Starports only. This may be useful for Code Blacks as the O2 timer stops once the client passes the forcefield. | |
| Min. landing pad | recommended | If the client is in a Large ship this is needed to ensure the station has landing pads big enough for them. |
| Max. station distance | May be useful for Code Blacks to limit the station's distance from its main star to reduce the needed SC time. | |
| Use surface stations | recommended | May be useful for Code Blacks to limit the needed SC and orbital flight time.Additionally may be used to filter out Odyssey stations for Horizons clients. |
| Ignore Fleet Carriers | recommended | Carriers can be unreliable (may have limited docking, moved, or have inactive services). In Code Black cases they should be verified by Seals before letting the client log in. |
| Station services | yes |
Required to ensure the station has Repair facilities and, if needed, Refuel and Rearm facilities as well as Interstellar Factions if the client needs those. |
Inara will then return a list of matching stations and carriers, sorted by distance. The list includes system and station names, system distance from your reference point and the station's distance from the main star. Clicking on a station reveals further details to ensure it's a viable option.
EDSM
You can use EDSM's station search to find the closest station or carrier to a given location with filtering options to ensure the station has Repair facilities, appropriate landing pads and limit its distance to their main stars. Below is a table showing what to enter in each fields:
Inara's filtering and search function is a lot more advanced and detailed so we would recommend using it over EDSM.
| Field | Required? | What to enter |
| Commander Position | yes | The system in which you or the client are located |
| Docked Station | Do not use | |
| Station Type |
Can be used to filter for Starports only. This may be useful for Code Blacks as the O2 timer stops once the client passes the forcefield. |
|
| Government/Allegiance | May be useful if the Client is wanted by specific factions to avoid the station and system security attacking them. | |
| Facilities | yes |
Required to ensure the station has Repair facilities and, if needed, Refuel and Rearm facilities as well as Interstellar Factions if the client needs those. |
| Sort by | yes |
Set to "Distance to commander position" |
EDSM will then return a list of matching stations and carriers, sorted by distance. The list includes system and station names, system distance from your reference point, the station's distance from the main star and what facilities it has installed. Clicking on a station reveals further details to ensure it's a viable option.
Long Distance Plotting
During rescues you may need to traverse long distances to reach the client. Below are multiple tools and tips that will make plotting and going on those trips easier and smoother.
Fuel Management
During rescues you should be using a Fuel Scoop and refuelling at stars along the way. Only the Main Sequence Stars will let you refuel though so it is recommended that you filter your galaxy map to only route you through those stars. There are two mnemonics to help remember those star types:
- KGB-FOAM
- Oh Be A Fine Girl, Kiss Me
Once you have plotted a route on the galaxy map you will see two kinds of lines connecting the stars along the route, solid and dotted ones. Solid lines mean that you will still have fuel at that point while dotted ones mean that you will have run out of fuel at that point and will need to refuel beforehand. If you're filtering the map to only route you through Fuel Stars this shouldn't be an issue but it's still good to be aware of this.
The galaxy map has two options under route settings that will make it plot either a fast or fuel efficient route. When responding to cases you should be using the fast option.
Neutron Star Boosting
If you're confident in doing so you can use Neutron Stars to supercharge your FSD. This involves flying into the cone of the NS in supercruise and staying there until your FSD is charged. Doing so with Neutron Stars gives a 4x jump range boost while only having a low amount of danger as long as you always point away from the star and never drop out of SC while in the cone.
While supercharging is also possible at White Dwarfs they only provide a measly 1.5x jump range boost while having a very large exclusion zone and tiny cones, making boosting off of them very dangerous and not worth it.
You can either allow the galaxy map to include Neutron Stars and White Dwarfs (it's unfortunately not possible to only include NS) by, in addition to the Main Sequence Star classes listed above, also including "Non Sequence Stars", or you can use tools like spansh to plot a very efficient neutron route. If you want to use Neutron Boosting along the way you should also enable that setting in the galaxy map under route options.
spansh Plotters
The Neutron Plotter on spansh website is a popular tool to generate efficient routes from A to B that make heavy use of Neutron Boosting. Simply enter your starting (source) system and your destination system as well as the fully fueled jump range of your ship and hit Calculate. Spansh will then compute a list of Neutron Stars as well as the estimated total number of jumps.
Be aware that this plotter does not include fuel stars so you'll have to make sure to add fuel stops yourself if you notice you're running low or there are multiple neutron jumps after each other.
Spansh has a more advanced plotter which will include fuel stops and take secondary neutron stars as well as FSD injections into account, it is however also a lot more complex to use. In this plotter you also select start and destination system but you will also need to include a copy of your ship build which you can get from sites like coriolis or EDSY, the amount of cargo you have on board and select if you want to use secondary neutron stars, FSD injections, if you're already supercharged and if you plan to refuel at every scoopable star along the way. You can also choose which routing algorithm it uses.
There is also a plugin for EDMC which you can use to do the calculations or enter a generated list. The plugin will then automatically copy the next system into your clipboard once you've reached the previous one so you can quickly plot to that next system.
Suggested Ship Builds and Modules
Ship choice is an incredibly important choice to make. It is a choice that can mean the difference between 2-300 jumps, insufficient limpet count, or a pirate destroyed client.
Here are some specific ships we recommend for a range of sealing situations.
Anaconda
An old multi-role classic. Flexible and long-range.
The Anaconda has been a mainstay of the Hull Seals since our inception. It is a multi-role workhorse with a multitude of options, from rapid repair response to high capacity limpet carry. It can be outfitted to run and fuel-scoop with low temperature outputs and up until recently it enjoyed the title of the longest jumping ship used for seal-work (currently out-shadowed by the long-jumping rapid repair Mandalay).
Here you can find an example of a commonly used Anaconda outfitting with moderate limpet space, relatively long range and tools needed for basic seal work.
Krait Phantom
Cost effective, minimal engineering, starter sealer.
The Phantom provides a cost effective choice for both seals just beginning their lives in Elite and old seals that want a 'cheap self-destructor' to return to the bubble fast. Comparable to the Anaconda in jump-range (in a smaller form factor), the Krait still proves a popular ship for a myriad of seals.
This example outfitted by CMDR Inhooman is a great example of what can be created with a medium-landing-pad ship.
Mandalay
The undisputed champion of jumping.
Cool, fast, super-long range, Haply's dream conceptualised. It is one of, if not the best ships for sealing. Respectful of your time, respectful of your client's time, its a cool jumping speed freak built on sheer ridiculousness and insanity. Need fuel, scoop while you charge your FSD. Need to get around a planetary body fast, use the supplied and optimised Super Cruise Overdrive. Once you try a Mandalay, you will find it difficult to fly another ship.
Created by CMDR Akastus, this Mandalay is a fully engineered, fully armed vessel with everything a seal would ever need to repair a client in need.
Federal Corvette
Heavily armed walrus support, NPC pirate protection for clients in need.
Recommended only for armed support of clients in danger of NPC pirate threat, the Corvette offers a high-damage, high-survivability platform suited to most high risk combat situations.
Here you can find a common loadout for Walrus responders.
Bring your own ship
If these suggested ships aren't your fancy you can choose to build your own! We do however urge your choice of ship to have an appropriate jump range (above 50LY), an appropriate fuel scoop, an appropriate Repair Limpet Controller (3D, 5D or 7D) and appropriate limpet cargo space to repair a client (8t or more).
Our Discord has a forum channel with more builds from our members.
Common Terms
Here's a list of some common terms and abbreviations used during repair procedures. These are not required, nor official. As such, this list is provided as a courtesy. You are encouraged to use whatever works for you, so long as others can understand easily. In general, + is used for an affirmative or a good result, and - for a negative or bad result.
General Terms during Repair Ops
- BC: Wing Beacon.
- Chemseal: Hull Seal with Decontamination Limpet
- CB: A Code Black Situation
- DC: Disconnected, or kicked out of the game. Also used for game crashes.
- FR: Friend Request.
- Fuel Rat: A member of The Fuel Rats organization with a focus on emergency response for fuel shortages.
- Inst: Instance.
- Killer Whales: Hostile Players.
- Mechanic: Members of the Hull Seals.
- Mode Conf: Game Mode confirmed on Comms Panel.
- Otter: A Hull Seal with Fuel Limpet Controllers onboard, capable of providing emergency fuel.
- Pied Piper: A Seal on a Code Black who leads Clients to stars for fuel, providing a guide of safe range for scooping.
- RC+: Repair Completed.
- RL+: Repair Limpet Engaged.
- PW+: Paperwork Complete.
- Seals: This fine organization, or members thereof.
- Sharks: Hostile Ships.
- Sys Conf: System confirmed on the galaxy map.
- Walrus: A Hull Seal equipped for defensive, NPC-ONLY actions.
- WR: Wing Request.
Callouts during Cases in Order
- FR+/-: Whether a Friend Request has been succesfully accepted and you can see the Client in your friends list.
- A message about the Client being in the wrong game mode or version if that's the case.
- sysconf+: Once you've confirmed that thei system the Client is actually in matches the one they reported. If it doesn't send a message about the mismatch but don't mention the correct system, this helps with filtering bad actors.
- WR+/-: Whether a Wing Request/Team Invite has been successfully accepted and you can see the Client in your Wing/Team on the top of your HUD.
- TM+/-: same as WR+/-
- SYS+: Once you're in the Client's system.
- BC+/-: Whether you can see the Client's Beacon once you're in their system. Follow it up with the distance in LS, eg
BC+ 23LS - inst+/-: Whether you have successfully entered the Client's instance after dropping and can see their ship and not just the beacon markers. Follow it up with the distance in km if it's longer.
- RL1+: Once the first repair limpet has attached itself to the Client's ship. Increase the number for each limpet. Feel free to add the Client's hull percentage at the time so Dispatch can estimate how long the repair will take.
- RC+: Once repairs have been completed and the Client is at 100% hull.
- PW+: Once you've filed PW. Not really needed anymore as HalpyBOT will also send a message.
Dispatch may sometimes ask you about the status of certain things like if you've accpedted the Client's friend request or if their beacon is visible by asking FR? and BC?
If anything odd happens during a case that has no well known callout just send a message explaining what happened.
Common Terms and Abbreviations
- The Bubble: Civilized Space, commonly fought over by powerplay factions.
- Blob: Did you know a group of seals is actually called a Blob?
- Client: The person in need of hull repairs.
- Cascade Winging: The way of quickly pulling CMDRs to an instance by entering with a wing, leaving, and pulling in more exponentially.
- Dispatch: The trained player coordinating the repair and assignment of Seals.
- Pup: A Seal-In-Training.
- Drebin's Lament: An unsuccessful Code Black.
- XA: Explorer's Anchorage, the most remote station in the galaxy. Located near the center of the galaxy.
Common Mistakes and Issue Troubleshooting
General Troubleshooting
During rescues, there are numerous issues that can present themselves. This guide is designed to help Seals fix these issues onthe-go.
- Instancing Issues Checklist:
- Confirm Instance Type (Open, Solo, Private Group)
- Verify system target and cycle wing beacons.
- Confirm that messaging can go through.
- If sending a test text message fails, have both parties restart the game.
- Check the geographic location of the parties involved. If parties are from different geographic regions (Ex, States vs Oceana) consider sending a different responder.
- Reinstance via Supercruise and Nav-Lock drop.
- Attempt manual drop, without using navlock.
- Sometimes Explorers don't fly alone! Try having a friend wing both the Seal and the Client in.
- Hostile CMDRs
- Sometimes, for one reason or another, independent CMDRs delight in disrupting intergalactic rescue vessels. The first step is to remain calm.
- If you suspect a hostile CMDR may be in the area, inform your Dispatcher immediately.
- For added security, have one of the SEALS form a private group with the CMDR. This can be done from the Friends and Private Groups tab in the main menu.
- If you come under fire, all seals are to withdraw immediately, as well as the client, by any means fit.
- Please note, this does not mean combat logging. Combat logging (force quitting to the Main Menu) is
considered an exploit by FDEV, and is not supported by this organization. - If engaged by a hostile NPC, inform Dispatch and seek the advice or assistance of a Walrus. Do not request Walrus support for hostile CMDRs.
PC
- Most information on this base is written with the PC framework in mind. Therefore, except when specified, all information and troubleshooting guides should apply.
- There are known network and instancing issues related to the geographic location of CMDRs. If this issue presents itself, and reinstating fails, possibly assign a Seal from a different geographic region.
PlayStation
- The biggest point of concern with PLAYSTATION rescues is that the CMDR must add his or her Seals to their PSN friends list in order to receive our service. Ensure that the client knows how and is able to do so.
- In order to use our services, the CMDR must also be paying for the PSN network pass. Without this network, we will not be able to service the CMDR.
Xbox
- The biggest point of concern with XBOX rescues is that the CMDR must add his or her Seals to their XBOX LIVE friends list in order to receive our service. Ensure that the client knows how and is able to do so.
- Sometimes, Online Privacy and Safety Settings are not set properly to allow friend requests to be sent or received.
- If issues arise, ensure the client is set to ONLINE in their profile and that their privacy settings are set properly.
- If issues persist with friend requests, have one or both of the Seals attempt to FR the Client.
- If the XBOX LIVE servers are offline, the rescue must be postponed.
Other Tips and Tricks
Sometimes, Seals find resources or tools that are useful to share, that we think are worth sharing. However, these don't exactly fit well in other categories or on other pages. This page contains a few resources that we've found over our time in the Galaxy.
Please keep in mind, this page contains links to resources the Seals are not responsible for and have no control over their content. Please contact us with any questions or concerns, and be careful about what sites you visit on the web.
Charts and Graphs
Ship Size Chart
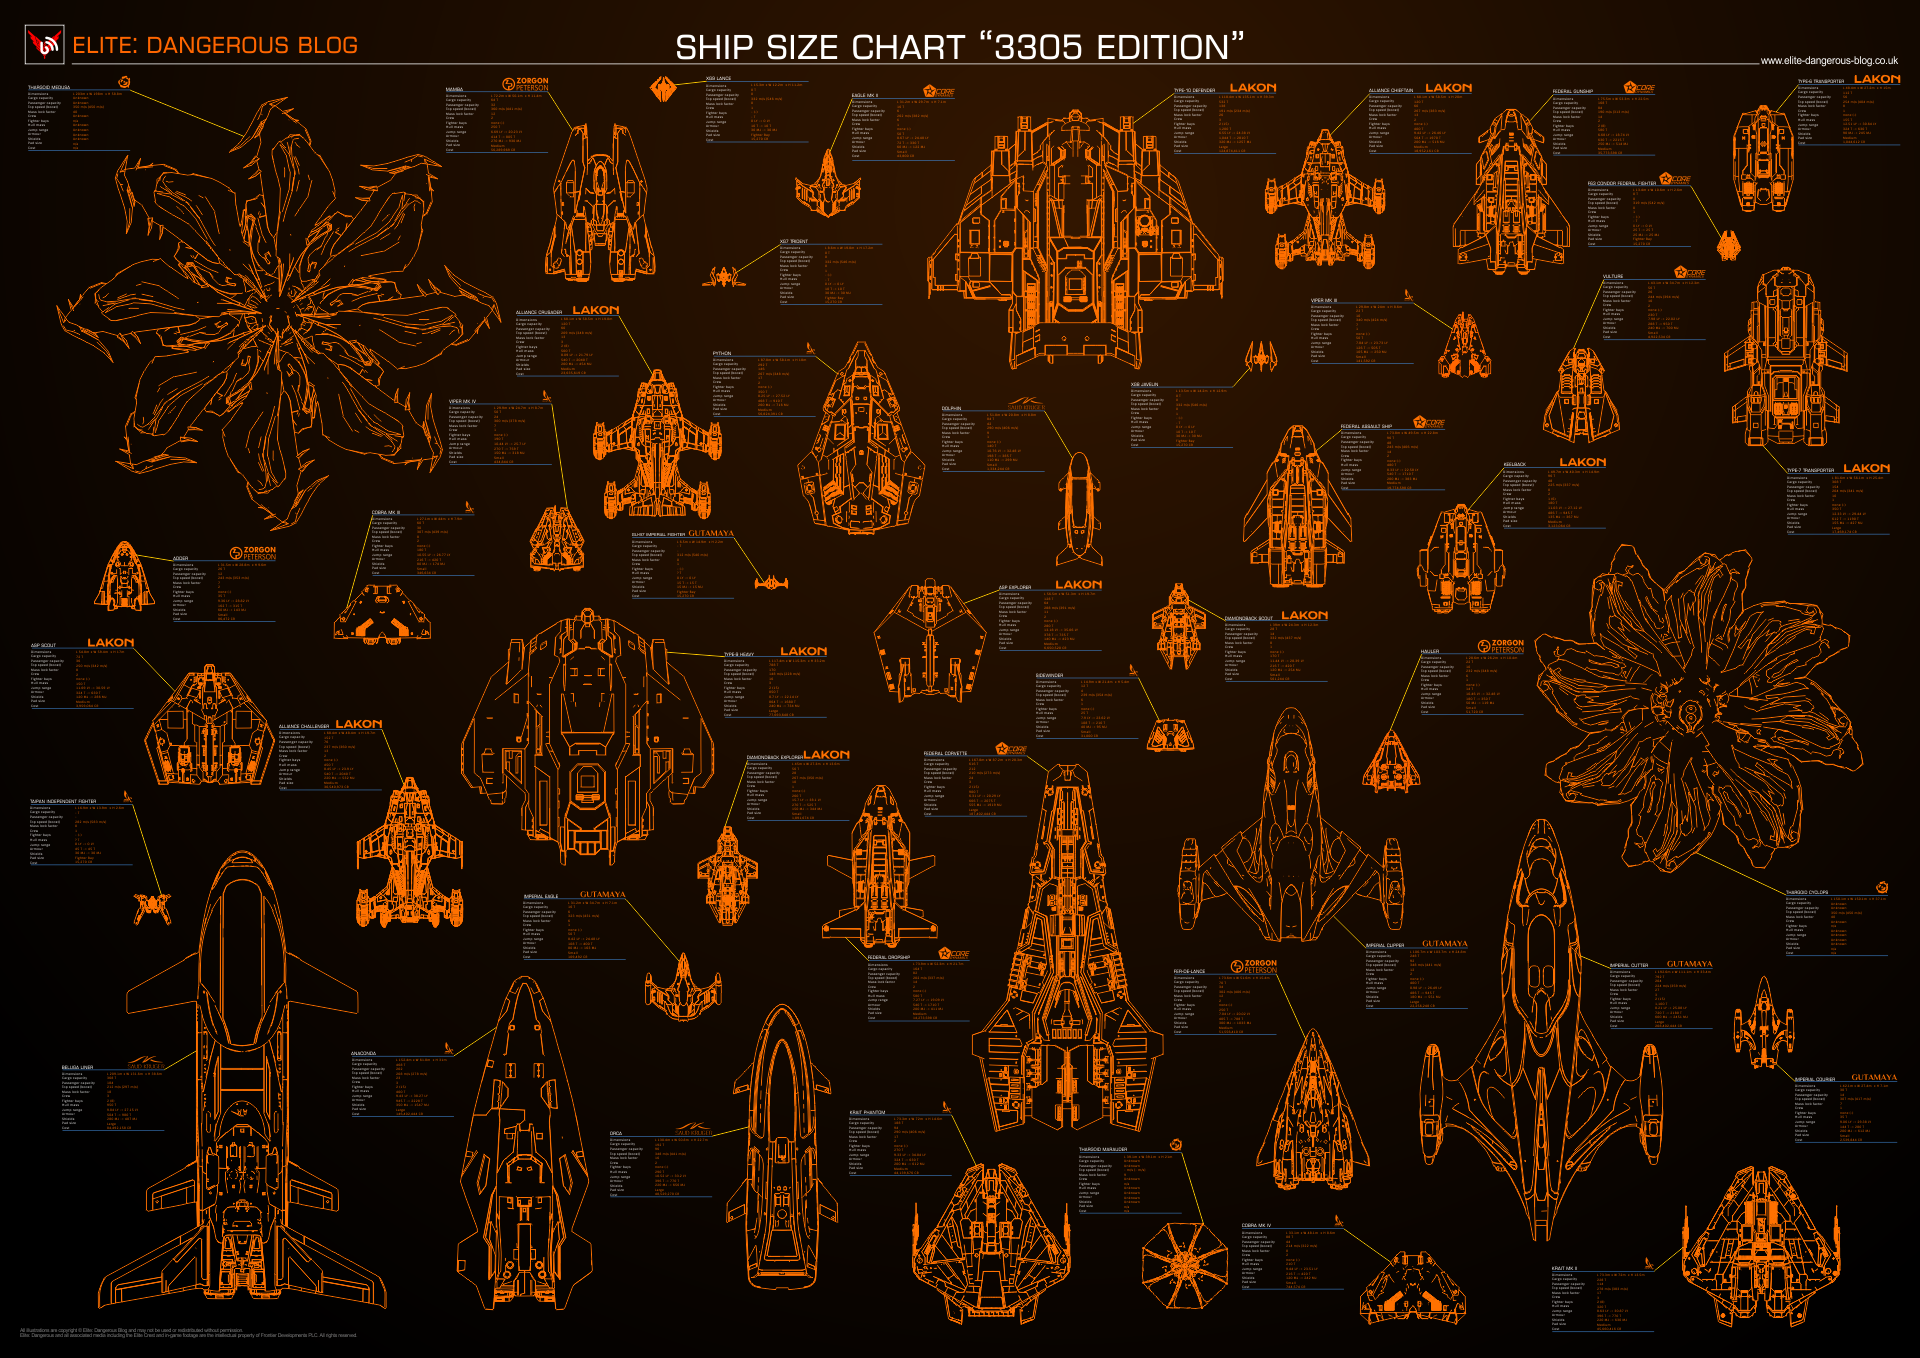
Source: View on the Elite Dangerous Blog (Wayback Machine)
Stellar Object Scan Chart

Link: https://i.imgur.com/1meKYTH.jpg
Stellar Object Value Calculation (Approximate)
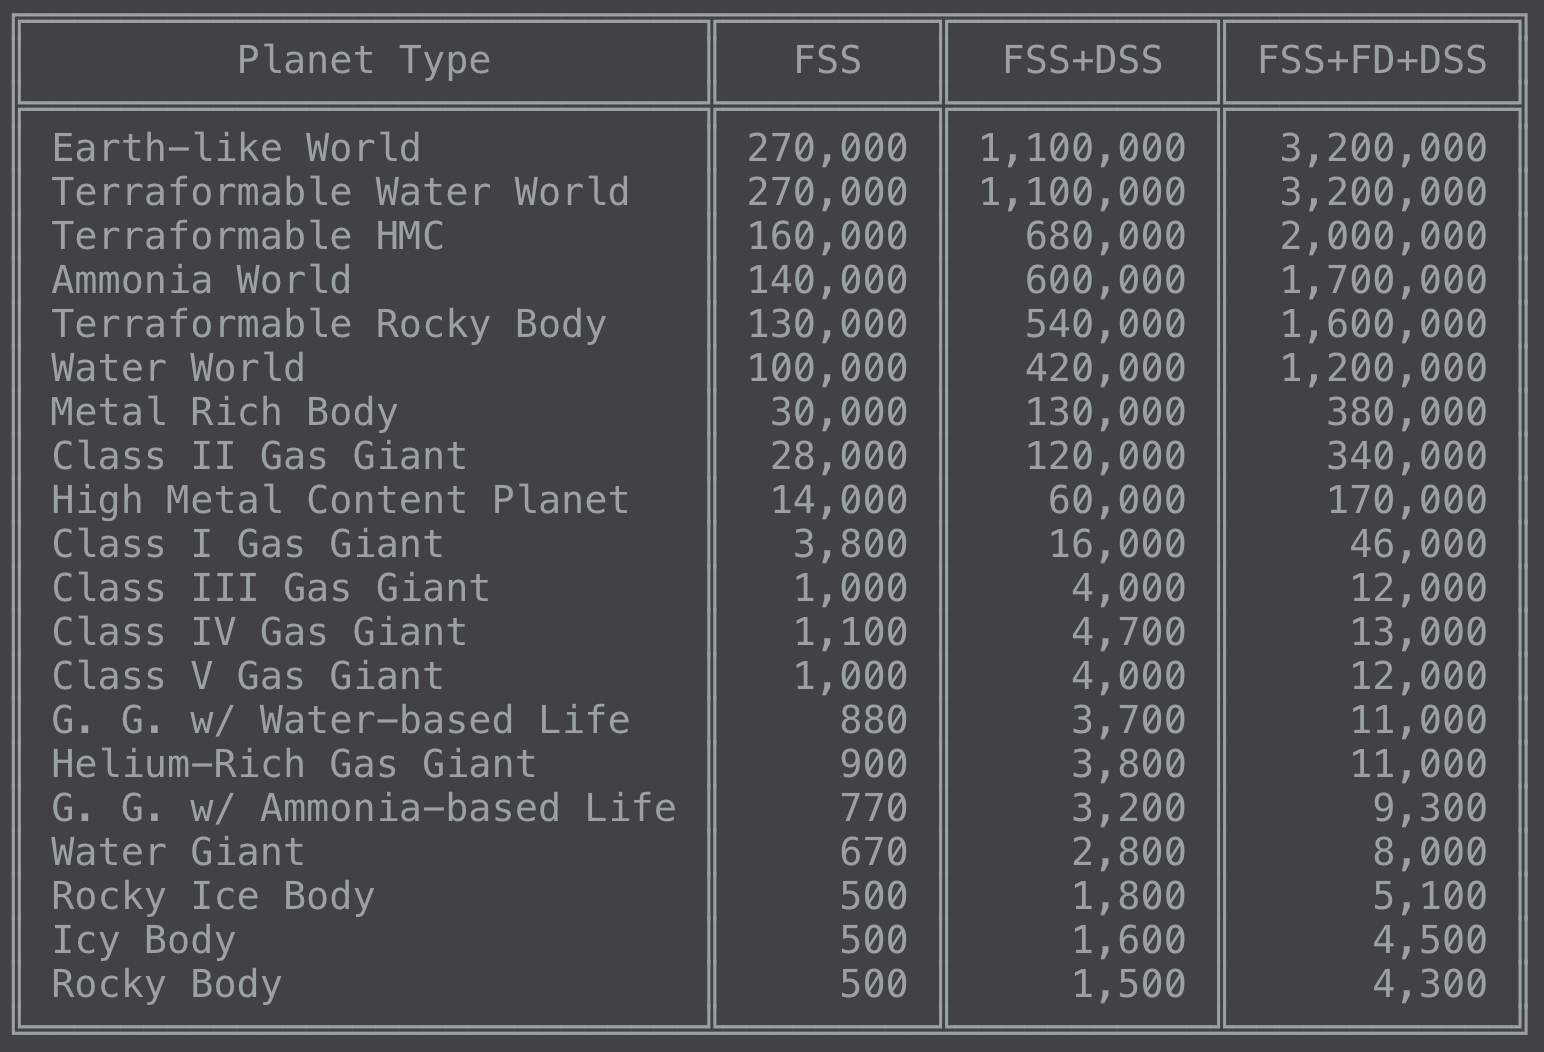
Source: Fleetcomm Discord Bot
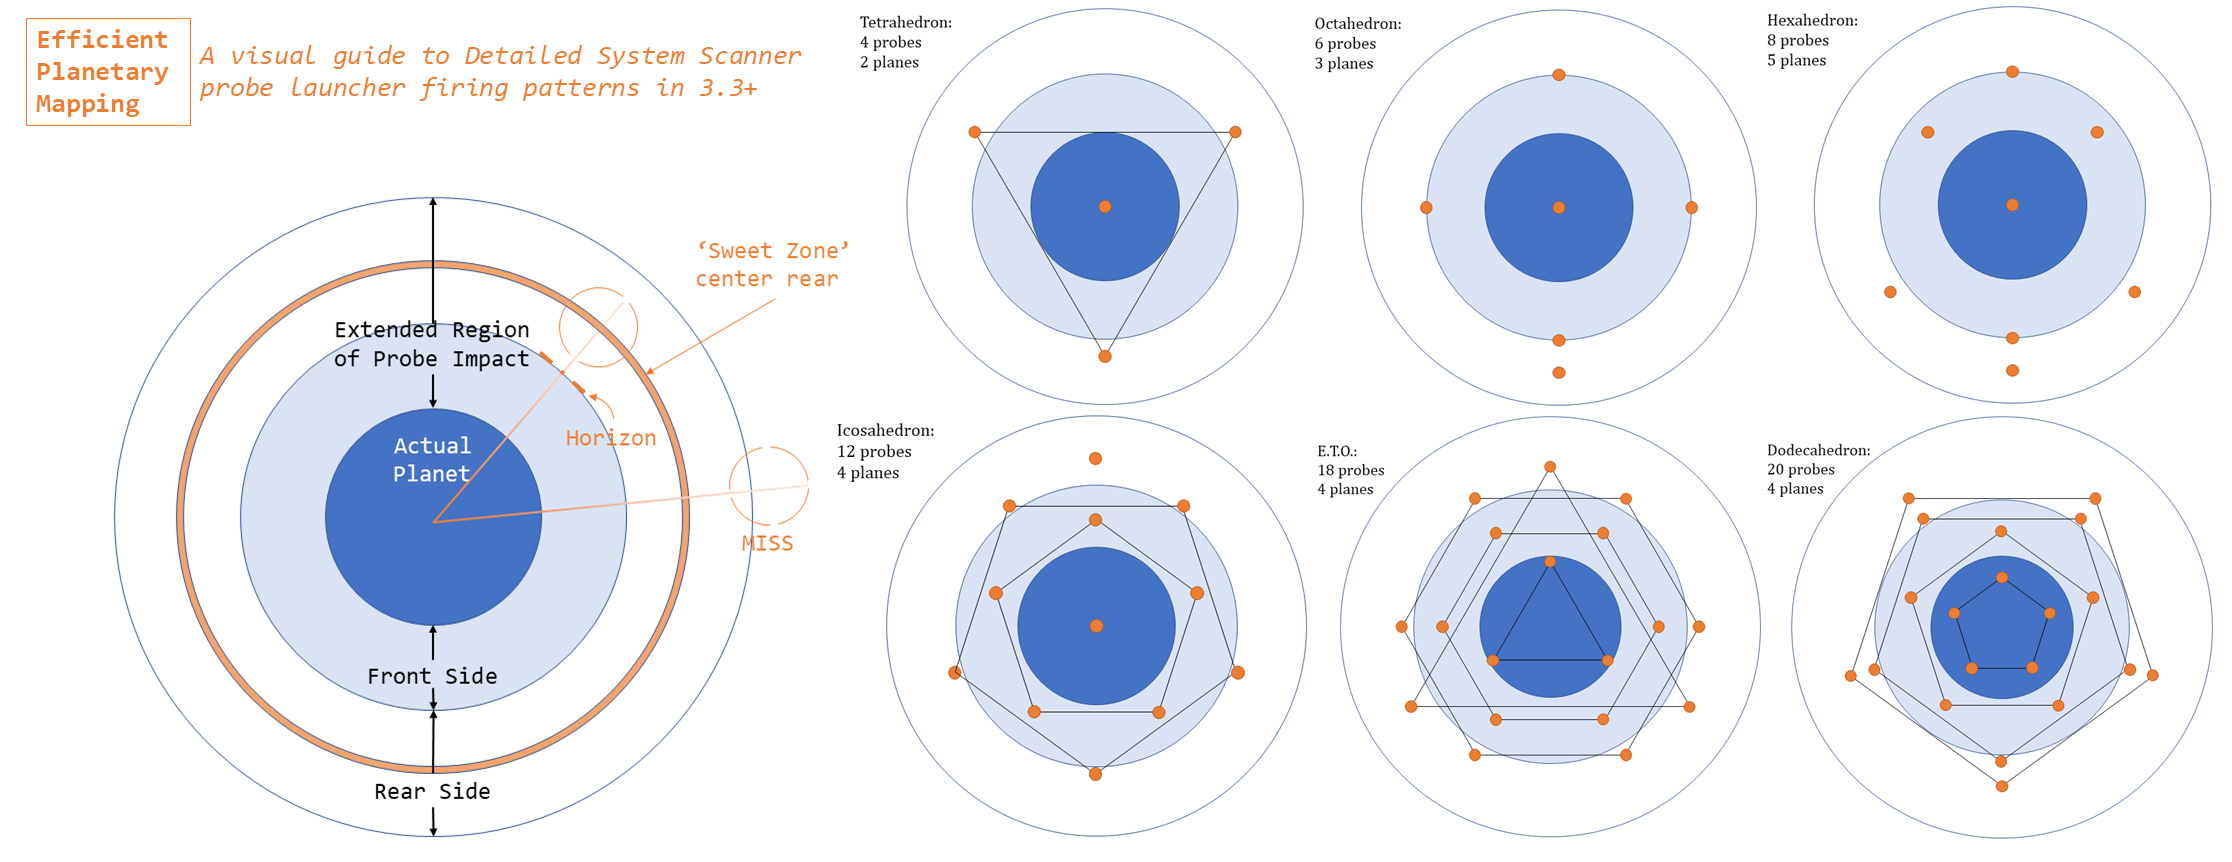
Efficiency Target Plotter
Reddit and Forum Guides
Unlocking Engineers quickly:
https://np.reddit.com/r/EliteOne/comments/8bs6g8/foxs_stepbystep_guide_to_unlocking_engineers/
Guardian Modules:
https://forums.frontier.co.uk/threads/walkthrough-guardian-module-blueprints.438289/#post6856649
Guardian Weapons:
https://forums.frontier.co.uk/threads/walkthrough-guardian-weapon-blueprints.445508/#post6979326
Guardian SLFs:
https://forums.frontier.co.uk/threads/walkthrough-guardian-vessel-blueprints.446206/#post6993998
Finding Escape Pods:
https://forums.frontier.co.uk/threads/guide-fast-way-to-find-occupied-escape-pods-near-colonia.447311/
Material Engineering Database:
https://forums.frontier.co.uk/threads/elite-dangerous-scavenger-a-new-database-of-materials-for-engineers.367052/
Mining Info
When it comes to the Seals, one of the most important people to have around during Code Blacks is our miners.
iMU mining guide. All things mining:
https://www.reddit.com/r/EliteMiners/wiki/index
Hotspot overlap locator tool:
http://edtools.ddns.net/miner
To find the best selling price of painite:
https://eddb.io/commodity/83
iMU Discord:
https://discord.gg/jFcrtdj
| Laser Size | Factor | Power Usage |
| Small | 1.0 | 1x |
| Lance | 1.2 | 1.2x |
| Medium | 3.0 | 2x |
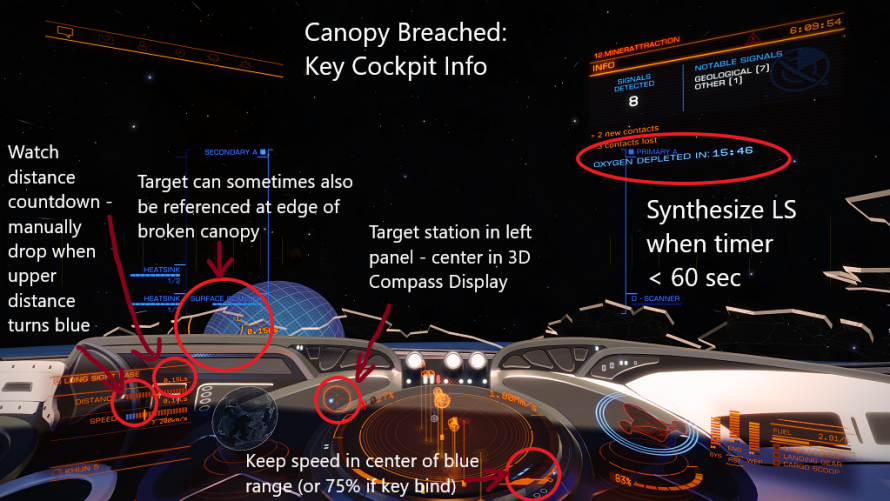
Broken Canopy Navigation
Galaxy Navigation
Down to Earth Astronomy Program: https://drive.google.com/drive/folders/1Q0Ffy3ZkS6b3-GGcPVAFCPIQbTBjXEXo
Video about the software: https://www.youtube.com/watch?v=XPAjvogRp2o
Neotron’s program: https://github.com/neotron/EDPathFinder/tree/1.3.0
Technical Guides and Tools
Keybind Backup: https://github.com/Noodles4Pasta/Save-ED-Keybinds/releases
Elite: Dangerous Ports:
These are the TCP and UDP ports in use by the game.
TCP 4430/6661
UDP 19364/3478/3479
Other Text Guides
Mat Farming Guide
https://docs.google.com/spreadsheets/d/1yo1iHP9KUXpoBaIzJsRsDxfAcQa7cBq0YUIFy3m2NII/edit
Materials
Thargoid Mats
HIP 17403 A4 crashed ship
1/2 way between the 2 lower ships, sensors will roll down the hill and can be shot to get Sensor fragments. Relog and do it again.
(my favorite location, also available at the location below)
Hyades sector aq-y d81
meta alloys and thargoid mats.
GUARDIAN MATS
Synuefe EN-H d11-96
Look for "convoy" and “ship wreckage” signal sources to find the guardian mats per Will’s post here:
https://forums.frontier.co.uk/posts/7869982/
GUARDIAN DATA
Synuefe NL-N C23-4 B 3
48.1808, -48.3718
There are two Obelisks right next to each other. Stand in between them. Scan both, relog, rinse and repeat.
From CirrusFlare
Manufactured Mats
Synuefe jb-g b58-6 6h
“Camp C-N04”
Or
Hyades Sector DR-V c2-23 A 5
Dav’s hope
Or any high-grade signal source
HIP 12099 planet 1b
Jameson’s crashed cobra
For data mats and trade.
Raw mats
Outotz HD-J D9-3
Planet B 8 D Antimony.
HiP 36601
Planet C 1 A Polonium
Planet C 1 D Ruthenium
Planet C 3 B Tellurium
Planet C 5 A Technetium.
Outotz LS-K D8-3
Planet B 5 A Yttrium
Recommended Engineering Pins
Your mileage may vary. However, for a general feel of things, this is the "Community-Suggested" pins.
Core Internals
Selene Jean: Armor (not HRPs, because you can taxi HRPs out and do them there)
Hera Tani: Power Plants (Armored)
Elvira Martuuk: FSD (Longrange)
The Dweller: Distributors
Professor Palin: Thrusters
Lori Jameson: Life Support (No G5s)
Juri Ishmaak: Detailed Surface Scanner
Marco Qwent: Power Plants (Overcharge up to G4)
Felicity Farseer: FSDs (Shielded)
Tiana Fortune: Sensors
Optional Internals
Lei Chung: Shield Generators
Bris Dekker: FSD Interdictors (No G5s)
Utility Slots
Didi Vatermann: Shield Boosters
Ram Tah: Heatsinks
Weaponry
The Sarge: Cannons
Broo Tarquin: Beams/Pulses/Bursts
Zacariah Nemo: Frag Cannons
Liz Ryder: Missiles or Torpedoes
Tod McQuinn: Multicannons or Rails
Bill Turner: Plasma Accelerators
Quick and Dirty Seal Ships
No Engineering, No Fluff, quick and dirty.
Asp X
https://s.orbis.zone/47h3
Krait Phantom
https://s.orbis.zone/47h9
Anaconda
https://s.orbis.zone/47hc
Ship Technical Stats
Jump Ranges:
https://tinyurl.com/upjump/
How to Get Ships Fast:
Nemisis_quick_build_guide.docx
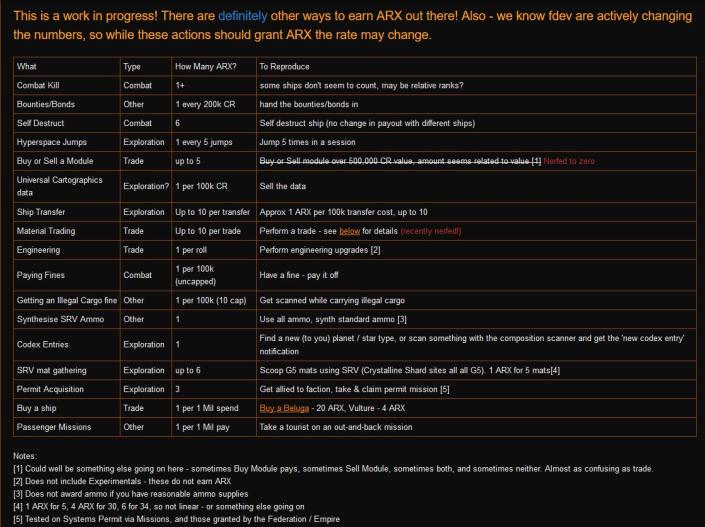
ARX
Completely subject to change.
Fantastic Shortlinks and Where They Lead
The following is a list of shortlinks that the Seals use, and where they lead. This list is not exhaustive, and many such links exist.
| Link | Notes |
| https://hullse.al/status | The Status Board for Hull Seal services. |
| https://hullse.al/bugs | Your place to submit bug reports for the Seals. |
| https://hullse.al/issuetrack | The Seal Issue Tracker for submitted bugs. |
| https://hullse.al/Maps | A heatmap of Hull Seal rescues, provided by EDAstro! |
| https://hullse.al/TipsNTricks | A collection of miscellaneous Tips and Tricks compiled by Seals. |
| https://hullse.al/SOP | A quick link to our Standard SOP. |
| https://hullse.al/kfSOP | A quick link to our KingFisher SOP. |
| https://hullse.al/csSOP | A quick link to our ChemSeal SOP. |
| https://hullse.al/cbSOP | A quick link to our Code Black SOP. |
| https://hullse.al/dSOP | A quick link to our Dispatcher SOP. |
| https://hullse.al/links | A page that doesn't quite exist yet... |
| https://hullse.al/gitlab | The Hull Seal git code repository, by GitLab. |
| https://hullse.al/journal | The Hull Seal cAPI Reader (Currently under Maintenance) |
| https://hullse.al/tlookup | A link for our Trainers to look up Seals and their rescue history. |
| https://hullse.al/stats | The Hull Seal stats page - alternatively, https://hullseals.space/statistics |
| https://hullse.al/FantasticShortlinksAndWhereTheyLead | ... |
| https://hullse.al/youtube | Our Youtube Channel! |
| https://hullse.al/twitch | Our Twitch Channel! |
| https://hullse.al/reddit | Our Reddit Community! |
| https://hullse.al/twitter | Our Twitter! |
| https://hullse.al/PrivPol | The Seal Privacy Policy |
| https://hullse.al/ToS | The Seal Terms of Service |
| https://hullse.al/wiki | A link to this wiki |
| https://hullse.al/register | Register for a Seal account |
| https://hullse.al/login | Login to your Seal account |
| https://hullse.al/ircwiki | Our wiki pages on IRC and how to use it |
| https://hullse.al/ircguide | A guide of how to set up and use various IRC Clients |
| https://hullse.al/DW2 | Our wiki page on the Distant Worlds 2 Expedition |
| https://hullse.al/StellarUnknown | Our wiki page on the Stellar Unknown Expedition |
| http://hullse.al/PerseusReach | Our wiki page on the Perseus Reach Expedition |
| https://hullse.al/events | The collection of all our events that Seals have officially been a part of. |
| https://hullse.al/guides | A collection of guides for Elite: Dangerous and the Seals. |
| https://hullse.al/YourData | What we do with and how we treat your data. |
| https://hullse.al/cookies | How we use Cookies on our website. |
| https://hullse.al/cheating | Our position on cheating and the Hull Seals in any game. |
| http://hullse.al/ImportantInfo | A collection of all the "Important Information" pages. |
Fleet Carriers
The Hull Seals plans to operate 3 Fleet Carriers, providing essential services to Explorers across the galaxy.
H.S.C. Limpet's Call
The Limpet's Call, the flagship of the Seal Fleet, operates as a member of the Deep Space Support Array, a coalition of Carriers by Fleetcomm and the Distant Worlds Organization. The Limpet's Call is currently stationed in Phroi Bluae QI-T e3-3454, to support explorers and provide an anchor point and base in the Rykers Hope region as part of the DSSA.
H.S.R.C. Arf Mechanicus
The Arf Mechanicus operates on an at-rental basis for expeditions, providing a dedicated repair and support array for expeditions. Unlike usual Seal services, this does come at an in-game fee.
Expeditions who rent out the carrier must cover all fuel, upkeep, and maintenance costs for the carrier, for the duration of the expedition. This fee can be covered in many different ways, from material donations, commodity markets, and others.
If you'd like to rent out the carrier for your expedition, contact us!
H.S.R.C. Beachmaster
The Beachmaster is the Seal's last resort when all else fails. She is the Seal's ace-in-the-hole. A massive logistical response - but no cost is too great to help a client.
If a Client gets themselves into a system they cannot escape from, if practical, the Seals will jump the Beachmaster into system to attempt a rescue of the client. This situation is a logistical challenge - and is an option not chosen lightly.
Soon
This is a Silly Article
The content in here isn't to be taken super-sealiously, and is provided for laughs.
Soon
"Soon" is a general term used by the Seal Leadership (and Seals in general) that provides no context for actually when a particular thing will be done or released. All "Soon" means is that it is under consideration by the Seal staff, in discussion, or in development.
"Soon" does not imply a particular date, time, state of being, flow of direction, or any specific point in our understood reality in the past, present, or future. There is no guarantee that "Soon" will ever happen, or that it won't happen. Any promises of "Soon" should be taken lightly. "Soon" can be interchanged with many other words that all mean the same or similar things, including but not limited to "Could", "Might," "Plans to be," "Near Future", "Recent", and more.
"Soon" is dependent on a number of factors, both in and out of the control of the Seals, including timezones, the difficulty of the task, the importance of the task, ethical dilemmas, the average cost of a pound of fish, unexpected maintenance, third-party vendor delays, unexpected heat-deaths of stars, new projects adopted, changes to the Elite and other games, and actually getting our scattered minds to focus on a single topic.
Types of Soon
We'll fill this out Soon.
Examples of "Soon"
| Thing | First Announced | Actually Released |
| IRC | On or Before 10 April 2019 | November 23, 2020 |
| CMDR Management v2 | 23 June 2020 | 24 June 2020 |
| Automated Paperwork | 10 August 2019 | 29 May 2020 |
| Merch | 16 April 2019 | 23 February, 2021 |
| Ship Registry | 28 April 2019 | 16 June 2020 |
| Accounts System | 15 July 2019 | 22 December 2019 |
See Also
Soon at the World of Warcraft Wiki
Valve Time at the Valve Developer's Community
Real Soon Now at the Wictionary
Ship Registry Codes
For some CMDRs, the Seals may be their primary - or only - social group in the game we all share and love. Sometimes, people want to rep and show off their ships, or emblazon their ships with things that identify them as Seals. This page will attempt to provide some cohesion and unity to the clutter of prefixes, registry numbers, and the like for both Carriers and Ships alike.
Some Guidelines
As this is a method of showing off your Seal membership in-game, any ship or carrier flying with either Seal prefixes, Seal registry codes or any other method of displaying "Seal" status, must conform to the following guidelines:
- Any Seal who is registered and in good standing may choose to make their ship or carrier a "Seal" vessel.
- Any Seal who is registered and in good standing may use any registered Seal prefix.
- Only the three carriers under the direct control of the Staff are considered "official" carriers.
- You may not advertise your carrier as "Official", and your actions are your own and not the groups.
- (For Carriers) If you are declaring an official "squadron" or backing as the Seals for things like expeditions or events, you must get Admin approval and follow the same procedures as you do with your regular ships.
- All ships named in this way, or displaying affiliation in any way to the Seals, may only engage in CONSENTUAL PvP only. The onus is on the Seal to be able to prove the PvP was consensual if issues arise.
- While on duty or on a call, PvP is forbidden.
Registry Numbers
You can view all registered Seal ships at Our Fleet page. Registration is optional. To manage your ships, go to our Vessel Registry portal.
All Seal ships begin with the prefix HS, and then a unique number of up to 4 digits. Variation is common among independent ships.
Ship Prefixes
This is a Silly Section
The content in here isn't to be taken super-sealiously, and is provided for laughs.
| HSRC | Hull Seals Rescue Carrier | The Generic Prefix for Carriers |
| HSRV | Hull Seals Rescue Vessel | The Generic Prefix for Ships |
| HSHC | Hull Seals Heavy Cruiser | Medium and Large Combat Ships |
| HSPS | Hull Seals Patrol Ship | Small Ships |
| HSSS | Hull Seals Support Ship | Non-Combat vessels like limpet warehouses, etc. |
| HSXV | Hull Seals Experimental Vessel | We're breaking some serious science! |
| HSCV | Hull Seals Cartographic Vessel | Exploration and Mapping Vessels |
| HSS | Hull Seals Ship | An Alternative Generic Prefix |
| HSSC | Hull Seals Small Craft, Hull Seals Support Carrier |
SLFs, Shuttles, Tiny ships. Alternatively, Support Carriers |
| KFRV | KingFishers Rescue Vessel | Kingfisher-primary vessels |
| HSCB | Hull Seals Cargo Barge | Cargo Ships |
| HSW | Hull Seals Walrus | Ships designed to defend clients from hostile NPCs, allowing time for the Client to escape. |
| HSA | Hull Seals Auxillary | Reserve Seal Ships |
| HSDV | Hull Seals Decon Vessel | Ships equipped with decon limpets |
| HSFB | Hull Seals Fun Bus | "Because y'all need a fun bus" ~ Flyerblade |
| HSTC | Hull Seals Transport Carrier | Carriers used to shuttle around Seals |
| HSFC | Hull Seals Fuel Carrier | Carriers used to refuel the other Seal carriers |
| HSMC | Hull Seals Mining Carrier | Carriers carrying Seal mining teams |
| HSMV | Hull Seals Mining Vessel | Seal Ships specialized for Mining |
| HSA | Hull Seals Asylum | Ships designed to contain Seals... |
Frequently Suggested Things
It's often been said there's no such thing as a bad idea - and that's true enough. However, sometimes there ideas that are brought up a lot as "the next big thing" for the Seals, but for one reason or another just don't work out. While we don't discourage new ideas, sometimes after a topic gets brought up so many times, we have to lay it to rest.
Case Management in Discord!
Perhaps one of the most common suggestions is to cast off IRC and return to managing and receiving cases exclusively in Discord. Discord is great for groups of friends, and in fact the Seals maintain a social presence on Discord, but we don't take cases anymore there like we did during DW2. Discord has downtime we can't control, prevents our management of troublemakers who might join, requires accounts, and other issues that we can't control.
- The bridge bot has downtime we can't account for.
- The bridge bot sometimes has issues with different charactersets
- The bridge bot sometimes scrambles the order of messages
- What happens when Discord goes down?
Roster Lists of Seals by Timezone
This is a super slippery slope that we're very, very uncomfortable treaing down. By rule, the only way for a Seal to be assigned to a case is to call jumps - even friendly "hey, XYZ are you online/can you take this?" makes us wary. We don't want Seals to feel pressured to Seal by being online, or being during their "usual" time. Sometimes, people can't respond but want to chat, and sometimes, people want to just play the game and not Seal.
While we encourage Seals to seal when they can, we don't want to make the Seals a "Seal all the time or leave" atmosphere either. Not to mention... you might be online, but on the other side of the galaxy. Sometimes, you're just plain out of range.
Paperwork Filing Guidelines
Primary Seal: Don't forget to do your paperwork!
Words we've all read, often helpfully shouted at us by HalpyBOT. But why, you ask. Why do I have to fill out a form when I'd rather get back to whatever else it was I was doing? No, it's not just to waste your time, paperwork is critical toward making sure the Seals run like a well-oiled machine.
Paperwork is one of the most important duties bestowed upon any Seal after a case is complete. Paperwork is our way of making sure that we know all the details of a case, and most importantly, can recreate what happened if something goes wrong. Every time a case starts, even if it ends up not being technically within our wheelhouse, paperwork should be filed for later reference. Paperwork is reviewed by the PPWK review team, the SOP teams, Dispatchers, and even other Seals to check what happened during a given case, and learn from it. Details included in paperwork may go toward improving our services and procedures, to offer the client the best possible chance of success. Paperwork might also help inform our staff where our wording and advertising can be confusing, and help ensure that we can limit false cases in the future.
So, with that said, how should you file various paperwork situations?
Categories of Paperwork
There are 5 different categories of case closure recognized by the Seals. Successful, Failed, Redirected, False Case, and Other. Here's what they mean:
- Successful: The Client was rescued, using Seal assets and resources. This is what we always want our cases to be, and it means that the mission was accomplished. Use this status even if it's not a technical "Seal" or "Kingfisher" rescue, such as CMDR Extraction, Fuel situations where it was impractical to transfer the client, module repair requests where reboot/repair worked, or something else. Anytime you as a Seal complete the mission, use this. Be sure to specify if it's not a standard seal case in your notes, however!
- Failed: While unfortunate, there are times where we can't save the client. This status is regrettable, and should always serve as a learning opportunity for the Seals, Dispatchers, and Clients. Anytime a mission fails, and the Client was using Seal resources or under Seal direction, use this status. Be sure to state in the notes what went wrong - these cases should have the most details in the notes of any case.
- Redirected: Sometimes, a case just isn't in our wheelhouse. There are dedicated organizations and support networks in place for a large number of different situations, where we are less familiar. The Client's needs should always come first, and ensuring they get the best help possible is the ultimate responsibility of any Seal or Dispatcher. Use this status when a Client is sent to another support network, and explicitly leaves seal services. Examples include redirections to the Fuel Rats, DSSA, Fleet Carriers' Owners Club (FCOC), Cocaine Bears, or other named entities. This includes direct diversion to an established Station.
- False Case: Every once in a while, someone tries to interfere with the mission of the org, or maybe they just didn't need our help after all. This is saved for spam, abuse of systems cases, times a Client never responds to attempts to contact, maliciously or deliberately ignores Seal instructions, or explicitly declines Seal services. Why file these cases? They help us keep tabs on how often people are coming and going from our systems, to inform those with hammers if need be. Note that this is not an alternative to a genuine client mistake, which would still be considered a failed case.
- Other: Finally, Other is a catch-all for anything that didn't get covered above. This includes cases where a client started to use Seal assets, but for some reason the mission is cancelled or incomplete. This includes cases where a Dispatcher comes to perform case intake, but the client died between when the call went out and seals could be rounded up. Anytime it doesn't make sense to file it somewhere else, put it here. Make sure your notes are clear what happened!
Dispatcher and other Seals on the Case
In the Who was Dispatching field you should enter the dispatcher(s) and in the Other Seals on the Case you enter any other Seals that might have been part of the case. This includes Seals who started the game to respond but didn't end up jumping because limpets didn't end up being needed or cause another Seal was closer. It also includes Seals helping Dispatch with the case by for example finding and confirming carriers for CBs.
Simply entering the Seal's name in the fields is not enough, you have to select their name from the list that will pop up so that their name is visible in the field in its own block. Sometimes a Seal won't appear in the list, this may be due to spaces in their name or the fact that thei're using an alt. In those cases simply ask that Seal what their username on the website is.
If there was no separate Dispatcher and Seal and you ended up both jumping as the Seal and dispatching the case you should toggle the Dispatched Case selector to Self-Dispatched. This also includes cases where no Seal was needed and there was only a Dispatcher, for example Reboot Repair cases or Code Blacks.
Notes
In the notes section you should write down any details that seem even remotely important about the case. Some examples:
- Distance travelled and amount of jumps if it was a longer distance case
- How many repair limpets were used and what ship the client was flying
- How they ended up in their predicament
- Any issues while getting to the client, for example
- wrong platform (Legacy vs Live Horizons vs Live Odyssey vs Console)
- wrong game mode (SOLO vs PG vs OPEN)
- wrong system
- issues with friend request
- issues establishing a wing
- issues entering their instance
- inter- and hyperdictions
- Any issues while repairing the client like running out of limpets or desynced hull percentage display
- Any oddities during the case like multiple people in the wing or odd client behaviour
Feel free to also take some screenshots of the case and let us know if you're ok with us posting them on our socials.
Remember, paperwork goes towards your case count, which can be recognized for service awards and badges, as well as new benefits in the future!
Stellar Cone Escape Guide
IF YOU ARE READING THIS, LOG OUT IMMEDIATELY!
On Odyssey or LIVE Horizons? Go HERE
Stuck in a Neutron Cone or White Dwarf Cone?
That's not good! Your situation is dire, but with a little luck you still have a chance to escape!
Follow these steps to attempt to escape:
- Take a deep breath! Panic will make things worse.
- If you were directed to this page from a Seal Case, DO NOT log in to the menu until instructed by your dispatcher.
- Set your Throttle to ZERO/IDLE.
- If you have an AFMU, begin repairing your CANOPY.
- Charge your FSD as soon as possible. If at any time the FSD charge cancels, begin it again.
- Try and point your ship AWAY from the star.
- BOOST once you are facing away from the star.
- If you get told to align with the escape vector, try and orient your ship while BOOSTING as often as possible.
- Keep going until you escape or explode. If you need, you can try and repair your FSD with an AFMU.
- Your canopy will probably explode. That's okay! Just focus on escaping the cone.
If you have managed to escape, and are still alive, your canopy is probably broken.
FLY AWAY FROM THE STAR for a few seconds, and then LOG OUT to the main menu.
After you've done that, Call the Hull Seals!
Video Example
Here's a video from CMDR All Crows Are Black showing proper technique:
Recovery to Orbit
IF YOU ARE READING THIS, LOG OUT IMMEDIATELY
On Console or Legacy Horizons? Go HERE
Stuck in a Neutron Cone or White Dwarf Cone?
That's not good! Your situation is dire, but thankfully, you still have a chance!
Follow these steps to escape the JetCone:
- Take a deep breath! Panic will make things worse.
- If you were directed to this page from a Seal Case, DO NOT log in to the game until instructed by your dispatcher.
- From the Main Menu, select "Help and Info".
- Next, select "Stuck Recovery".
- This will redirect you back to the main menu.
- Wait for your Dispatcher to instruct you to log in. Your ship will now be outside of the star's cone, and you can proceed to the next phase of the rescue!
After you've done that, Call the Hull Seals!
Stuck in an SRV?
The instructions above can also recover you to your ship from an SRV. Follow the same procedure, and you will find yourself back in your ship safe and sound!
Video Example
Here's a video from CMDR Technuwu313 on how to recover to orbit.